다음 글:
Reference
아래 사이트를 참조하여 작성한 문서입니다.
- Oracle Cloud infrastructure Documentation - SDK for Python
- The Python Package Index (PyPI) oci 2.66.0
- OCI Python SDK examples
Overview
Oracle Cloud Infrastructure (OCI) 자원을 관리할 때 가장 쉬운 방법 중 하나는 OCI Command Line Interface (CLI)를 이용하는 것입니다. 특히 Cloud Shell을 사용하게 되면 관련 유틸리티 설치 및 설정 과정없이 사용할 수 있어서 편리합니다. 하지만 OCI CLI의 장점에도 불구하고 데이터 처리나 그밖에 로직 처리와 같은 부분의 기능은 없는 것이 사실입니다. 이러한 이유로 SDK가 필요하게 됩니다.
OCI가 지원하는 Java, .NET, Go, Ruby, Javascript SDK와 마찬가지로 Python SDK를 통해 OCI 자원을 관리하는 코드를 작성할 수 있습니다. OCI Python SDK에서 지원되는 Python 버전은 3.6, 3.7, 3.8, 3.9 입니다.
SDK 개발 환경 세팅
이번 테스트를 위해 Oracle Linux 7.9 환경에서 Python SDK 구성을 했습니다. 이번 테스트와 같이 VM 인스턴스에서 매뉴얼하게 구성할 수도 있으나, 아래와 같은 방식으로 OCI Python SDK 사용 환경을 준비할 수도 있습니다.
- Cloud Shell: Cloud Shell에서는 자격 증명이 미리 설정되어 있고, Python SDK를 즉시 사용할 수 있게 되어 있습니다. Cloud Shell에서 Python SDK를 사용하는 방법은 다음 링크를 참조하시면 됩니다. SDK for Python Cloud Shell Quick Start
- Oracle Linux Cloud Developer image: VM 인스턴스를 Oracle Linux Cloud Developer platform image로 생성하면 Python 뿐만 아니라 지원되는 다른 언어의 SDK와 런타임 환경이 미리 세팅되어 있습니다.
Oracle Linux 7.9 환경에서 Python SDK 개발 환경 구성을 위한 준비해야 할 사항은 아래와 같습니다.
- OCI CLI 설치 및 설정
- Python 3.6 이상 설치, pip 설치
- Python SDK 설치
위 준비 사항 중 2022년 5월 현재 Oracle Linux 7.9에서는 Python, pip, Python SDK가 설치되어 있습니다.
Oracle Linux 7.9에는 Python 3.6.8 이 아래와 같이 설치되어 있습니다만, 디폴트 Python은 2.7.5 입니다.
[opc@demo ~]$ **which python3.6**
/usr/bin/python3.6
[opc@demo ~]$ **python3**
Python 3.6.8 (default, Nov 18 2021, 10:07:16)
[GCC 4.8.5 20150623 (Red Hat 4.8.5-44.0.3)] on linux
Type "help", "copyright", "credits" or "license" for more information.
>>> **quit()**
[opc@demo ~]$ **python --version**
Python 2.7.5
OCI Python SDK에서 지원되는 Python 버전이 3.6 버전부터 이므로, 디폴트 Python 버전을 아래 alternatives 명령을 통해 3.6.8 버전으로 변경합니다.
디폴트 Python 버전으로 변경된 것과, Python 라이브러리를 관리해 주는 pip도 설치되어 있는 것을 알 수 있습니다.
[opc@demo ~]$ **alternatives --list | grep -i python**
[opc@demo ~]$ **sudo alternatives --install /usr/bin/python python /usr/bin/python2.7 1**
[opc@demo ~]$ **sudo alternatives --install /usr/bin/python python /usr/bin/python3.6 2**
[opc@demo ~]$ **sudo alternatives --config python**

There are 2 programs which provide 'python'.

  Selection    Command
-----------------------------------------------
   1           /usr/bin/python2.7
*+ 2           /usr/bin/python3.6

Enter to keep the current selection[+], or type selection number:
[opc@demo ~]$ **python --version**
Python 3.6.8
[opc@demo ~]$ **pip3.6 --version**
pip 9.0.3 from /usr/lib/python3.6/site-packages (python 3.6)
Python SDK도 이미 설치되어 있는 것을 알 수 있습니다.
[opc@demo ~]$ rpm -qa | grep sdk
python36-oci-sdk-2.66.0-1.el7.x86_64
Python SDK 구성을 위해 필요한 OCI CLI는 아래와 같이 설치되어 있지 않기 때문에, 따로 설치해야 합니다. 특정 버전을 골라 OCI CLI를 수동으로 설치할 수도 있습니다만, 여기에서는 OCI CLI 최신 버전을 자동으로 설치했습니다.
[opc@demo ~]$ oci --version
-bash: oci: command not found
[opc@demo ~]$ bash -c "$(curl -L <https://raw.githubusercontent.com/oracle/oci-cli/master/scripts/install/install.sh>)"
  % Total    % Received % Xferd  Average Speed   Time    Time     Time  Current
                                 Dload  Upload   Total   Spent    Left  Speed
100 16641  100 16641    0     0   151k      0 --:--:-- --:--:-- --:--:--  151k

    ******************************************************************************
    You have started the OCI CLI Installer in interactive mode. If you do not wish
    to run this in interactive mode, please include the --accept-all-defaults option.
    If you have the script locally and would like to know more about
    input options for this script, then you can run:
    ./install.sh -h
    If you would like to know more about input options for this script, refer to:
    <https://github.com/oracle/oci-cli/blob/master/scripts/install/README.rst>
    ******************************************************************************
Downloading Oracle Cloud Infrastructure CLI install script from <https://raw.githubusercontent.com/oracle/oci-cli/v3.2.1/scripts/install/install.py> to /tmp/oci_cli_install_tmp_hTY9.
######################################################################## 100.0%
Running install script.
python3 /tmp/oci_cli_install_tmp_hTY9
-- Verifying Python version.
-- Python version 3.6.8 okay.

===> In what directory would you like to place the install? (leave blank to use '/home/opc/lib/oracle-cli'):
-- Creating directory '/home/opc/lib/oracle-cli'.
-- We will install at '/home/opc/lib/oracle-cli'.

===> In what directory would you like to place the 'oci' executable? (leave blank to use '/home/opc/bin'):
-- Creating directory '/home/opc/bin'.
-- The executable will be in '/home/opc/bin'.

===> In what directory would you like to place the OCI scripts? (leave blank to use '/home/opc/bin/oci-cli-scripts'):
-- Creating directory '/home/opc/bin/oci-cli-scripts'.
-- The scripts will be in '/home/opc/bin/oci-cli-scripts'.

===> Currently supported optional packages are: ['db (will install cx_Oracle)']
What optional CLI packages would you like to be installed (comma separated names; press enter if you don't need any optional packages)?:
.
.
.
===> Modify profile to update your $PATH and enable shell/tab completion now? (Y/n): Y

===> Enter a path to an rc file to update (file will be created if it does not exist) (leave blank to use '/home/opc/.bashrc'):
-- Backed up '/home/opc/.bashrc' to '/home/opc/.bashrc.backup'
-- Tab completion set up complete.
-- If tab completion is not activated, verify that '/home/opc/.bashrc' is sourced by your shell.
--
-- ** Run `exec -l $SHELL` to restart your shell. **
--
-- Installation successful.
-- Run the CLI with /home/opc/bin/oci --help
이제 “oci setup config” 명령으로 OCI CLI 사용을 위한 환경 설정을 합니다. 이때 User OCID, Tenancy OCID가 필요합니다.
User OCID는 OCI 웹콘솔 오른쪽 상단의 User Profile > User Settings 에서 가져올 수 있습니다. 그리고 Tenancy OCID는 OCI 웹콘솔 오른쪽 상단의 User Profile > Tenancy 화면에서 가져올 수 있습니다.
OCI CLI 설정 과정에서 API Signing RSA key pair를 신규 생성했습니다.
[opc@demo ~]$ **oci setup config**
    This command provides a walkthrough of creating a valid CLI config file.

    The following links explain where to find the information required by this
    script:

    User API Signing Key, OCID and Tenancy OCID:

        <https://docs.cloud.oracle.com/Content/API/Concepts/apisigningkey.htm#Other>

    Region:

        <https://docs.cloud.oracle.com/Content/General/Concepts/regions.htm>

    General config documentation:

        <https://docs.cloud.oracle.com/Content/API/Concepts/sdkconfig.htm>

Enter a location for your config [/home/opc/.oci/config]:
Enter a user OCID: ocid1.user.oc1..aaaaaaaagxxxxxxxxxxxxxxxxxxxxxxxxxxxxxxxxxxxxxxxxxxxxxxxxxxx
Enter a tenancy OCID: ocid1.tenancy.oc1..aaaaaaaaxxxxxxxxxxxxxxxxxxxxxxxxxxxxxxxxxxxxxxxxxxxxxxxxxxxxx
Enter a region by index or name(e.g.
1: af-johannesburg-1, 2: ap-chiyoda-1, 3: ap-chuncheon-1, 4: ap-dcc-canberra-1, 5: ap-hyderabad-1,
6: ap-ibaraki-1, 7: ap-melbourne-1, 8: ap-mumbai-1, 9: ap-osaka-1, 10: ap-seoul-1,
11: ap-singapore-1, 12: ap-sydney-1, 13: ap-tokyo-1, 14: ca-montreal-1, 15: ca-toronto-1,
16: eu-amsterdam-1, 17: eu-frankfurt-1, 18: eu-marseille-1, 19: eu-milan-1, 20: eu-stockholm-1,
21: eu-zurich-1, 22: il-jerusalem-1, 23: me-abudhabi-1, 24: me-dcc-muscat-1, 25: me-dubai-1,
26: me-jeddah-1, 27: sa-santiago-1, 28: sa-saopaulo-1, 29: sa-vinhedo-1, 30: uk-cardiff-1,
31: uk-gov-cardiff-1, 32: uk-gov-london-1, 33: uk-london-1, 34: us-ashburn-1, 35: us-gov-ashburn-1,
36: us-gov-chicago-1, 37: us-gov-phoenix-1, 38: us-langley-1, 39: us-luke-1, 40: us-phoenix-1,
41: us-sanjose-1): us-ashburn-1
Do you want to generate a new API Signing RSA key pair? (If you decline you will be asked to supply the path to an existing key.) [Y/n]: Y
Enter a directory for your keys to be created [/home/opc/.oci]:
Enter a name for your key [oci_api_key]:
Public key written to: /home/opc/.oci/oci_api_key_public.pem
Enter a passphrase for your private key (empty for no passphrase):

Private key written to: /home/opc/.oci/oci_api_key.pem
Fingerprint: 83:c5:1b:3a:e1:80:67:50:8d:77:b1:19:0c:e2:5c:95
Config written to /home/opc/.oci/config

    If you haven't already uploaded your API Signing public key through the
    console, follow the instructions on the page linked below in the section
    'How to upload the public key':

        <https://docs.cloud.oracle.com/Content/API/Concepts/apisigningkey.htm#How2>
이제 API 키 중에서 public 키 내용을 OCI 웹콘솔의 사용자 정보에 등록해야 합니다. public API 키 내용을 복사합니다.
[opc@demo ~]$ cat .oci/oci_api_key_public.pem
-----BEGIN PUBLIC KEY-----
MIIBIjANBgkqhkiG9w0BAQEFAAOCAQ8AMIIBCgKCAQEArjGTCD3jcU5sQw2OKz8v
NTZCUvd+wlZlcyCmUDR+XoYeTYyoMW6rF2dk9Pgxkc3Aa+gCQoA3kwRdqay8f3Da
JVWnPdz8K84hCq+qdx3Uj5d6/4THOubjisvcZSmJoABufTemCknxO+jkZC8qVxgt
zeRMoK/XzGPR0oLpiMNpWrfXlFD770eOtBGuNjg1xCdbBuRxtoK5lPx0b7ClTYaj
Nj5wayA59nZt/HzG7xWCdGzJ0mP8A+z9Ptla5V8rcDGzl2gCxtpOgcYGRlXl7g0d
bngpKXZh9yMF/LHTuc1u+PAb5yg2mCp3PxLCXwitDgKTpFsHj9dGnHX5lzbryYuS
mwIDAQAB
-----END PUBLIC KEY-----
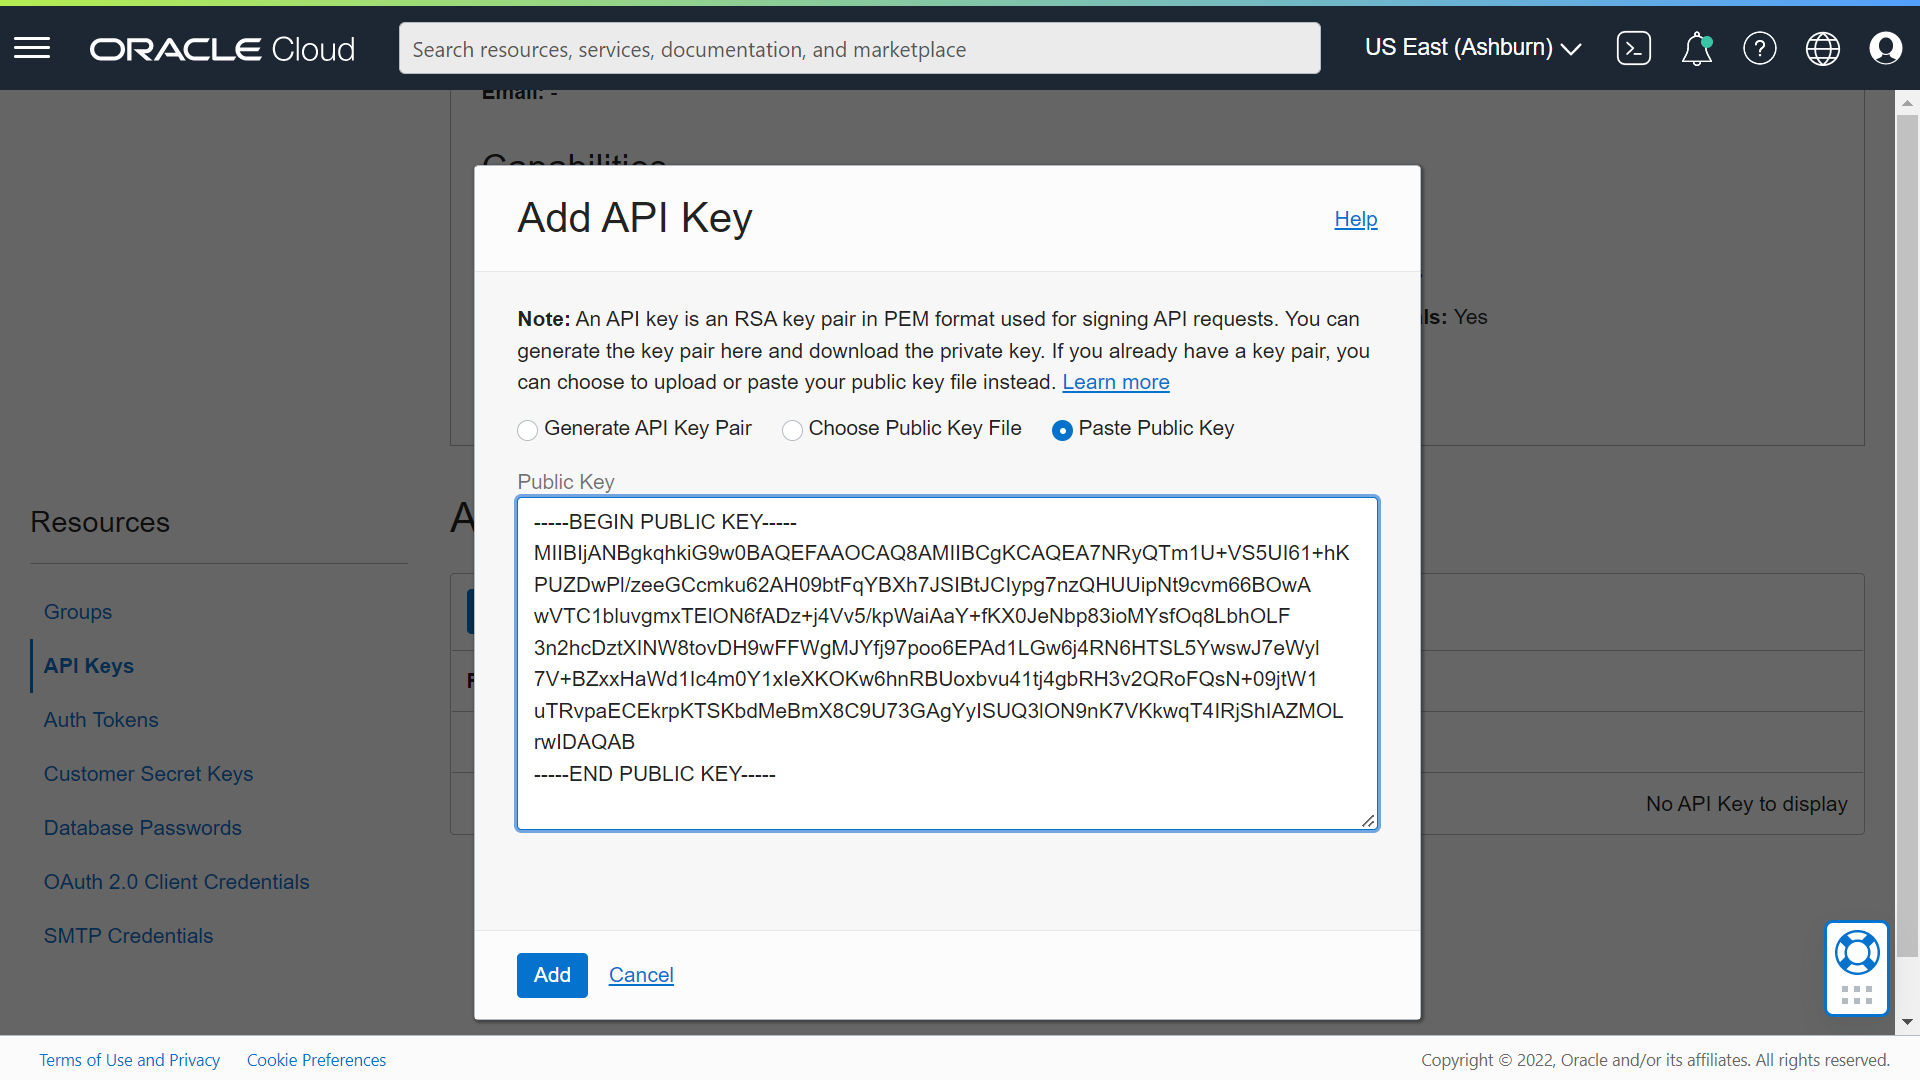
복사한 API public 키를 OCI 웹콘솔의 오른쪽 상단 User Profile > User Settings 의 API Keys 화면에서 등록합니다. Add API Key를 클릭해서 나타난 팝업창에서 Paste Public Key를 선택하고, public API 키를 붙여넣고 Add를 클릭합니다.
이제 터미널에서 oci 명령을 수행해서 OCI CLI가 정상적으로 수행되는지 확인합니다. 아래 명령은 오브젝트 스토리지 네임스페이스를 출력하는 명령입니다.
[opc@demo ~]$ **oci os ns get**
{
  "data": "apackrsct01"
}
이제 Python SDK 개발 환경 구성이 끝났습니다.
Python 샘플 코드 실행
OCI 자원을 관리하기 위해서는 OCI 패키지 라이브러리 설치가 필요합니다. pip으로 oci 패키지를 설치합니다. 일반적으로 “python -m virtualenv oci”와 같이 python 가상 환경을 만들고 이를 활성화(”source oci/bin/activate”) 한 후, 패키지를 설치하는 것이 권고되지만, 여기에서는 간단한 예제 구성을 위해 python 가상 환경을 생성하지 않았습니다.
[opc@demo ~]$ **sudo pip3.6 install oci**
WARNING: Running pip install with root privileges is generally not a good idea. Try `pip3.6 install --user` instead.
Requirement already satisfied: oci in /usr/lib/python3.6/site-packages
Requirement already satisfied: certifi in /usr/lib/python3.6/site-packages (from oci)
Requirement already satisfied: cryptography<=3.4.7,>=3.2.1 in /usr/lib64/python3.6/site-packages (from oci)
Collecting pyOpenSSL<=19.1.0,>=17.5.0 (from oci)
  Downloading <https://files.pythonhosted.org/packages/9e/de/f8342b68fa9e981d348039954657bdf681b2ab93de27443be51865ffa310/pyOpenSSL-19.1.0-py2.py3-none-any.whl> (53kB)
    100% |████████████████████████████████| 61kB 3.7MB/s
Collecting python-dateutil<3.0.0,>=2.5.3 (from oci)
  Downloading <https://files.pythonhosted.org/packages/36/7a/87837f39d0296e723bb9b62bbb257d0355c7f6128853c78955f57342a56d/python_dateutil-2.8.2-py2.py3-none-any.whl> (247kB)
    100% |████████████████████████████████| 256kB 2.6MB/s
Requirement already satisfied: pytz>=2016.10 in /usr/lib/python3.6/site-packages (from oci)
Requirement already satisfied: circuitbreaker<2.0.0,>=1.3.1 in /usr/lib/python3.6/site-packages (from oci)
Requirement already satisfied: six>=1.4.1 in /usr/lib/python3.6/site-packages (from cryptography<=3.4.7,>=3.2.1->oci)
Requirement already satisfied: cffi!=1.11.3,>=1.8 in /usr/lib64/python3.6/site-packages (from cryptography<=3.4.7,>=3.2.1->oci)
Requirement already satisfied: pycparser in /usr/lib/python3.6/site-packages (from cffi!=1.11.3,>=1.8->cryptography<=3.4.7,>=3.2.1->oci)
Installing collected packages: pyOpenSSL, python-dateutil
Successfully installed pyOpenSSL-19.1.0 python-dateutil-2.8.2
이제 터미널을 열어서 Python 환경에서 샘플 코드를 테스트합니다. 아래 샘플 코드는 oci 패키지 라이브러리를 import해서 oci 설정 정보를 세팅한 다음, 이를 이용해서 서비스 클라이언트를 만듭니다. 그리고 현재 사용자 정보를 가져와서 출력합니다.
[opc@demo ~]$ **python**
Python 3.6.8 (default, Nov 18 2021, 10:07:16)
[GCC 4.8.5 20150623 (Red Hat 4.8.5-44.0.3)] on linux
Type "help", "copyright", "credits" or "license" for more information.
>>> **import oci**
>>> **config = oci.config.from_file("~/.oci/config","DEFAULT")**
>>> **identity = oci.identity.IdentityClient(config)**
>>> **user = identity.get_user(config["user"]).data**
>>> **print(user)**
{
  "capabilities": {
    "can_use_api_keys": true,
    "can_use_auth_tokens": true,
    "can_use_console_password": false,
    "can_use_customer_secret_keys": true,
    "can_use_db_credentials": true,
    "can_use_o_auth2_client_credentials": true,
    "can_use_smtp_credentials": true
  },
  "compartment_id": "ocid1.tenancy.oc1..aaaaaaaa6maxxxxxxxxxxxxxxxxxxxxxxxxxxxxxxxxxxxxxxxxxxxxxxxxx",
  "db_user_name": null,
  "defined_tags": {},
  "description": "example@com",
  "email": null,
  "email_verified": false,
  "external_identifier": "xxxxxxxxxxxxxxxxxxxxxxxxxxxxxxxxxxxxxxxxxxxxxxxxx",
  "freeform_tags": {},
  "id": "ocid1.user.oc1..aaaaaaaaxxxxxxxxxxxxxxxxxxxxxxxxxxxxxxxxxxxxxxxxxxxxxxxxx",
  "identity_provider_id": "ocid1.saml2idp.oc1..aaaaaaaarxxxxxxxxxxxxxxxxxxxxxxxxxxxxxxxxxxxxxxxxxxxxxxxxx",
  "inactive_status": null,
  "is_mfa_activated": false,
  "last_successful_login_time": null,
  "lifecycle_state": "ACTIVE",
  "name": "oracleidentitycloudservice/example@com",
  "previous_successful_login_time": null,
  "time_created": "2019-01-22T08:40:24.791000+00:00"
}
<END>
다음 글:
'Cloud > Oracle Cloud Infrastructure (OCI)' 카테고리의 다른 글
| OCI Python Function 디버그하는 방법 (0) | 2022.05.13 |
|---|---|
| OCI Python SDK 설정, PyCharm설정, 샘플 코드 실행 방법 #2 (0) | 2022.05.10 |
| 처음 사용자를 위한 Oracle Cloud Infrastructure Function 기본 사용법 (0) | 2022.05.06 |
| OCI 리눅스 인스턴스 SSH 접속에 패스워드 인증으로 변경하는 방법 (0) | 2021.09.10 |
| OCI VM에서 VNC 설정 방법 (0) | 2021.08.04 |


